How to Cut and Seal Multifoil Insulation Like An Expert
Published: September 9, 2025
Published: September 9, 2025
Cutting and sealing is an essential part of the installation process for any multifoil product, and they could very well have a significant impact on the final performance of your insulation. We’ve touched on this topic briefly in this video, but we’re going to dive deeper into the topic in this post.
So, let’s take a look at the right way to cut and seal your multifoil insulation…
Every cut starts with a measurement.
Ask any serious professional and they’ll tell you the same: you’re only ready to make a cut once you’ve measured it out. So, before you’re ready to cut your multifoil, make sure you take the time to measure out exactly what you need.
And once you have, we always recommend spending an extra moment to mark your cutting line on the multifoil. That clear line will guide you through and keep your cut as accurate as possible.
Once you’re done measuring and ready to actually make your cut, you have a few different tools to choose from — each of which have their own method. So, let’s take a look at each of these, and when we’d recommend using them…
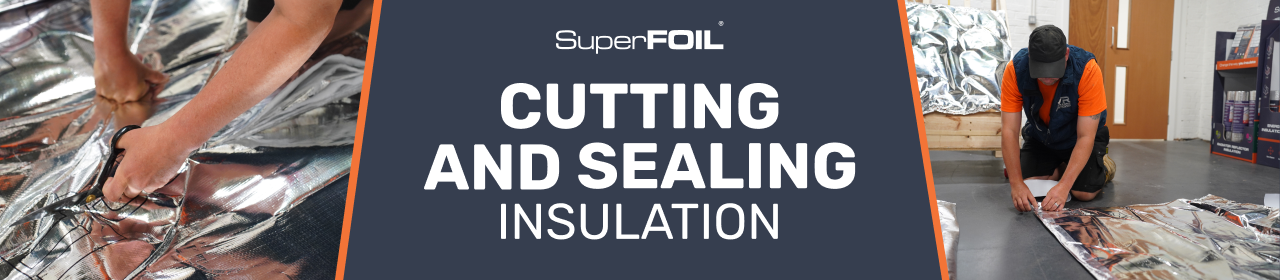
A good utility knife is one of the most versatile and easy-to-use cutting tools you could possibly ask for. So, it’ll come as no surprise that you absolutely can use these to cut your multifoil products to size…
Step 1: Grab a timber batten (or a similar straight edged, rigid object) and line it up along your cutting line — this is your “guide”;
Step 2: Press down firmly on your “guide” until you have fully compressed the multifoil, flattening it as much as possible;
Step 3: Press the blade of the utility knife lightly against the “guide” when making your cut, while maintaining firm pressure down into the multifoil;
Step 4: Maintaining this pressure, sweep the knife across the entire length of the multifoil in a single, continuous motion;
Step 5: Before removing your “guide”, ensure that you have cleanly severed every layer of the multifoil. If multifoil isn’t completely cut through (this most commonly happens with thicker products), then keep your “guide” in place and repeat steps 2-4 until you’re satisfied that the multifoil is cleanly cut through;
A utility knife is ideal for cutting thinner multifoil products in a controlled environment. In particular, we’d recommend using a utility knife when preparing pre-measured sections of insulation prior to installation, as this method is well suited to precise cuts.
However, when working with thicker multifoil products, you may run into issues when using this method. In these cases, we’d recommend making use of one of the other two cutting tools we’ve covered below…

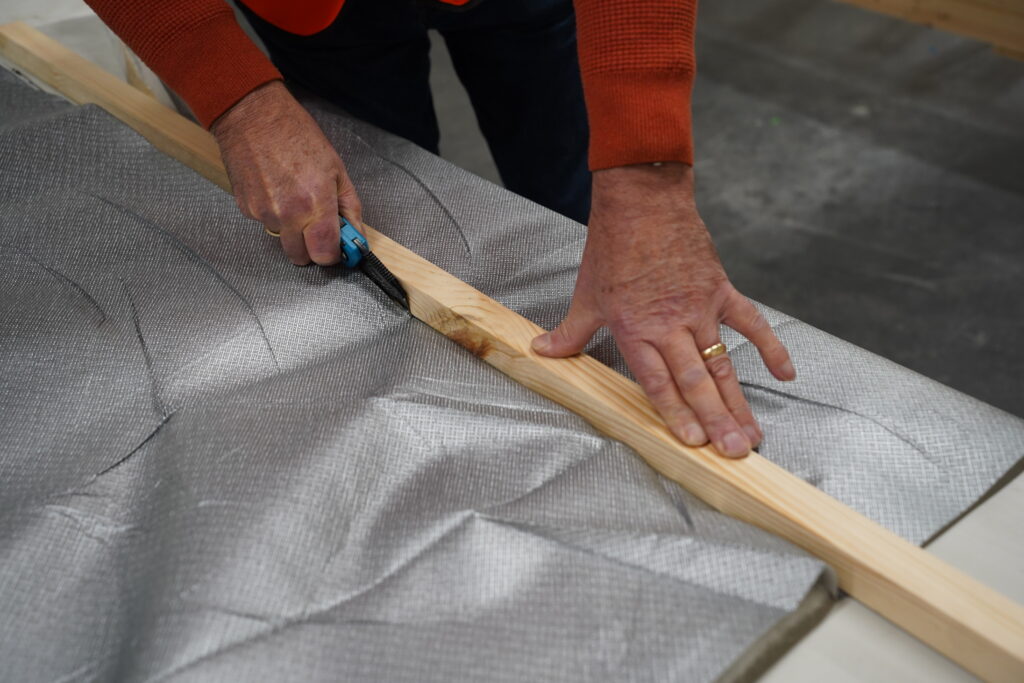
When it comes to flexible, mid-install cuts, scissors and shears are the very options you have at your disposal; and multifoil is no exception to that.
So, if you’d like to make use of these tools, then here’s the process we’d recommend following…
Step 1: Wherever possible, you should start by pulling the multifoil taut. Don’t pull too hard for this, just apply enough tension to keep the surface flat and straight;
Step 2: Carefully and precisely cut along your marked cutting line, making sure you slice cleanly through every layer of the product before moving the shears forward to make the next cut;
Expert Tip: If the section you are cutting away begins to grow slack during the cutting process, then you should apply additional tension to the slackening section to keep it taut during the cut. You might need to ask a helper to help you keep the multifoil taut while you are cutting it.
Shears are an incredibly flexible option, making them particularly well suited to use when you’re working in tight spaces, or need to make an otherwise awkward cut through your multifoil product.
In particular, these are the absolute best tool to have on hand when you need to make a cut on a multifoil product that is already installed — either partially or entirely — as these shears require the least support to ensure a clean, quality cut.
Of course, that flexibility does come at a cost. These are easily the most “difficult” cutting tool to properly use, which is to say they require the most skill to get a clean, high-quality cut. If you’ve got the skill, then that’s no problem at all. However, if you’re looking for a cutting tool that’s both effective and easy to use, then the next one is your best choice…
This is the absolute gold standard of multifoil cutting solutions — allowing you to make smooth, efficient cuts with the least possible effort. And here’s how…
Step 1: Much like with shears, your first step should be to gently pull the insulation taut. Again, you don’t need to apply much pressure to do this, just enough to keep the multifoil level;
Step 2: Align your rotary cutter with your cutting line, making sure you’re in a good position to pull the cutter smoothly across the multifoil;
Step 3: Press the button to start the blades on your cutter and then bring the cutter smoothly along the cutting line to make a single, clean cut;
Expert Tip: You should do your best to move the cutter across the multifoil at steady pace. Whipping the cutter across the multifoil too quickly could cause it to snag. Of course, snagging like this isn’t a major issue, but can be frustrating if you’re making lots of regular cuts. Ultimately, it’s better to adopt a steady pace that you know will work, rather than trying to rush through a cut.
These cutters are an incredible tool, allowing you to swiftly and effectively cut practically any multifoil product. This makes an Electric Rotary Cutter an excellent option if you find yourself working with a thicker multifoil product.
But, in particular, we would recommend making use of Electric Rotary Cutters if you’re working on a large-scale and professional insulation projects where you would need to make a lot of cuts.
However, it is worth noting that this can be a fairly expensive tool to get your hands on, which is why we primarily recommend it for large projects or for professionals who expect to routinely work with multifoil products.
After all, this is very much the easiest and most reliable way to cut multifoil, and that makes it well worth the price if you’re going to need to make those cuts regularly.
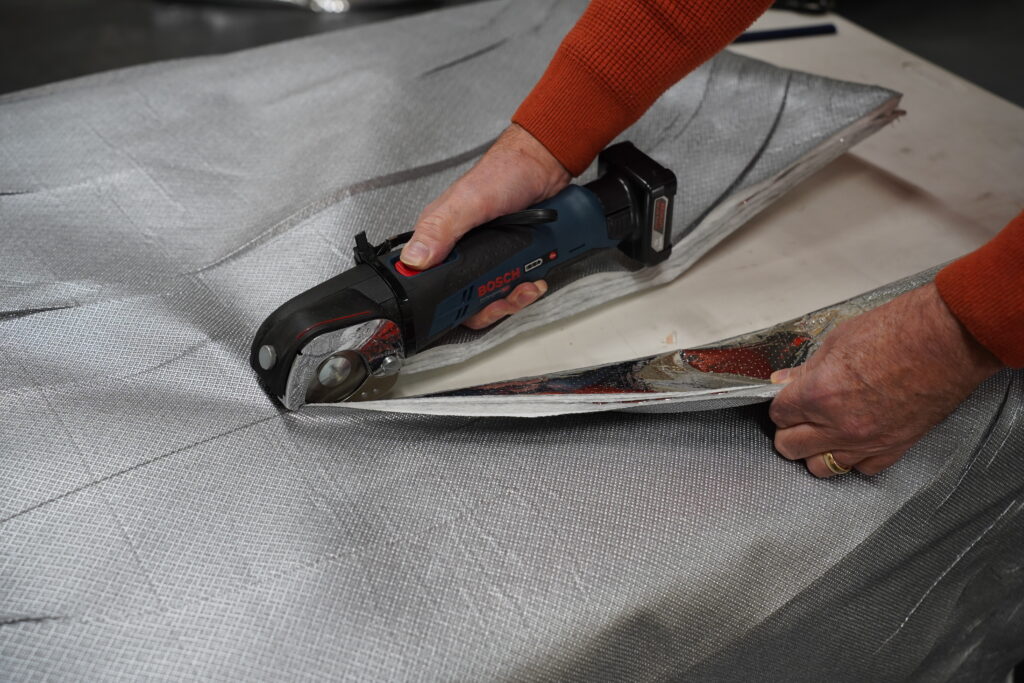
You should always follow up a cut by sealing the newly open edge of your multifoil product. We’ll explain why this is so important in a moment, but first let’s take a look at the right way to seal the cut edge.
The process of sealing the cut edge can be summed up in three simple steps…
This should result in total coverage of the cut edge with foil tape, entirely resealing the open edge of the multifoil product.
Expert Tip: Make sure you’re using the right foil tape product for your insulation. It’s not always a “one size fits all” situation when it comes to the tape you’re using. For example, if you’re using a breathable multifoil product, then you should make sure you’re using a breathable tape to seal your cut edges and overlaps.
The main reason is performance. Plain and simple.
By properly sealing any cuts, joints, and penetrations in the surface of your multifoil product, you are ensuring that you will get the absolute best performance out of that product.
This is because sealing helps to maintain the airtightness of the installation, ensures a consistent reflective surface, and minimises the possibility of thermal bridges. All of which could undermine the overall performance of your insulation if left unchecked.
So the question of why you should seal your multifoil becomes a simple one. Do you want the best performance from your insulation? If you do, then make sure you’re sealing your multifoil as you go.
If you’re working on a large project and you’d like some guidance on how to approach specific elements of your installation — such as a window reveal in your loft or an insect mesh in your wall — then you might want to take a look at our technical installation guides.
These have, of course, been created to provide guidance for SuperFOIL products specifically. However, the techniques and guidance we provide within should be applicable to practically any multifoil insulation product that you choose to use.
Of course, we would always recommend consulting the guidance provided by the manufacturer of any product you decide to use, to be sure you are getting the absolute most out of that product.
What’s more, if you are interested in using multifoil in your insulation project, then we’d always recommend reaching out to our expert technical team for support on your project. This guidance is 100% free of charge, and is intended mainly to make sure you get the absolute most out of your insulation project.
You can find out more about that support on our Discovery Session service page, so be sure to take a look if you are interested. Either way, we hope that the information in this page was useful to you and your project!